We’ve been using IPv6 for quite a while now on the aTech and Viaduct networks however my home ISP doesn’t support IPv6 natively. As you can imagine, this is quite a pain but there is a solution using TunnelBroker.net.
So… I want to ensure that all computers on my home network are able to access anything which uses IPv6. This guide explains how to go about setting up a full IPv6-enabled network using an EdgeRouter with an ISP which does not support native IPv6 and provides dynamic IP addresses.
Get an IPv6 tunnel
The first thing you need to do is head over to the TunnelBroker site and signup for an account and request a new tunnel.

Go to the site
Create an account or login with one if you already have one
Select Create Regular Tunnel
Enter your current IPv4 IP address in the IPv4 Endpoint field and select the location closest to your physical address.
Once you have created the tunnel, you’ll be given a number of IP addresses and network addresses.
Creating the tunnel
Now you need to add this tunnel to your EdgeRouter. Login to your EdgeRouter using SSH and execute the following commands.Login to your EdgeRouter using SSH.
$ configure
$ set interfaces tunnel tun0 description "HE IPv6 Tunnel"
$ set interfaces tunnel tun0 encapsulation sit
$ set interfaces tunnel tun0 local-ip 0.0.0.0
$ set interfaces tunnel tun0 remote-ip [SERVER IPv4 ADDRESS]
$ set interfaces tunnel tun0 address [CLIENT IPv6 ADDERSS]
Next, you need to configure a default route which will send all IPv6 traffic down over the new tunnel.
$ set protocols static interface-route6 ::/0 next-hop-interface tun0
You can now commit and save this configuration and give it a quick test.
$ commit
$ save
$ exit
$ ping6 google.com
> PING google.com(2a00:1450:4009:80a::2000) 56 data bytes
> 64 bytes from 2a00:1450:4009:80a::2000: icmp_seq=1 ttl=58 time=19.3 ms
> 64 bytes from 2a00:1450:4009:80a::2000: icmp_seq=2 ttl=58 time=10.4 ms
Although this is all working great, HE is sending your traffic to the IP address you entered when you created the tunnel. If this changes (i.e. you disconnect and reconnect to your ISP), your IPv6 tunnel will cease working. To resolve this, HE provides a Dynamic DNS endpoint which will receive your IP each time you connect and updates your tunnel configuration as appropriate.
Let’s set that up. To start, you’ll need to get some information from the tunnel broker site.
Your update key — this can be found on the advanced tab of your tunnel settings page.
Your tunnel hostname — you can find this on the main page in the list of all the tunnels you have configured. It’ll look something like thisusername-1.tunnel.tserv1.lon2.ipv6.he.net.
Run the following commands and replace pppoe0 with the name of your external interface.
$ configure
$ edit service dns dynamic interface pppoe0
$ set service dyndns host-name [TUNNEL HOSTNAME]
$ set service dyndns login [TUNNELBROKER.NET USERNAME]
$ set service dyndns password [UPDATE KEY]
$ set service dyndns server ipv4.tunnelbroker.net
$ top
$ commit
$ save
$ exit
You can check on the status of this at anytime using:
$ show dns dynamic status
> interface    : pppoe0
> ip address   : 146.200.56.42
> host-name    : adamcooke-1.tunnel.tserv1.lon2.ipv6.he.net
> last update  : Sat Jan 10 13:40:25 2015
> update-status: good
Although the EdgeRouter can now connect to IPv6 hosts, none of the other computers on your network are able to do this yet.
Configuring a firewall
Unless you want all your clients to be available publically (you probably don’t), you’ll need to configure an IPv6 firewall.
Firstly, you need to create the firewall itself. In this example, we’ll drop everything except existing connections.
$ configure
$ edit firewall ipv6-name home-ipv6
$ set default-action drop
$ set rule 10 action accept
$ set rule 10 state established enable
$ set rule 10 state related enable
$ top
Next, we need to associate this new firewall with our interfaces. I’m assuming thateth0 is the interface which connects to your local network.
$ set interfaces ethernet eth0 firewall out ipv6-name home-ipv6
$ commit
$ save
You’re now protected. If you need to allow certain hosts, you can do this by adding new rules to the home-ipv6 firewall.
Connecting clients
When we created our tunnel, we were allocated a /64 subnet (the “Routed /64”). This is the subnet which clients on your network will have IP addresses in. For example, my home network is 2001:470:1f1d:5::/64.
To begin, we need to allocate an address from this range to our router. Run the command below to add the address. Note that I have added 1 just before the/64.
$ set interfaces ethernet eth0 address 2001:470:1f1d:5::1/64
In order for your clients to connect they need to have their own IPv6 address. Unlike IPv4, the most common way to connect client machines to an IPv6 network is to allow them to choose their own address based on their MAC address. In order for them to do this, we need to tell them things like the router address and what DNS servers to use. This is known as a router advertisement.
$ edit interfaces ethernet eth0 ipv6
$ set router-advert prefix [YOUR ROUTED /64]
$ set router-advert radvd-options "RDNSS [YOUR ROUTER IPV6 ADDRESS] {};"
$ top
$ commit
$ save
Testing
Everything should now be working and the clients on your network should start having IPv6 addresses as well as IPv4 ones.
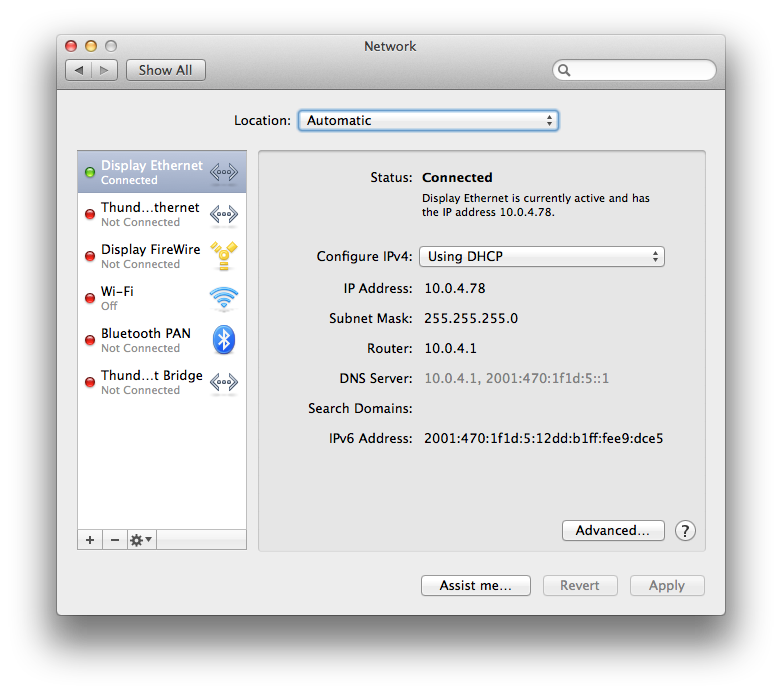
You can do some testing to ensure things are working for you. Here’s a few commands which I use to test different aspects of the IPv6 connection.
Testing connectivity with ping
$ ping6 google.com
> PING6(56=40+8+8 bytes) 2a00:1450:4009:80b::2000
> 16 bytes from 2a00:1450:4009:80b::2000, icmp_seq=0 hlim=57 time=16.416 ms
> 16 bytes from 2a00:1450:4009:80b::2000, icmp_seq=1 hlim=57 time=15.939 ms
Testing DNS
This command will return information about google.com. The -6 flag means that it will only use IPv6 to perform the lookups.
$ host -6 google.com
Another fun command to try is this…. this will lookup a DNS name and output the full trace of how it was located. You should be able to see that each step of the trace is resolved by an IPv6-enabled nameserver.
$ dig -6 +trace atechmedia.com
Next steps
Ensure that any websites you run have are enabled for IPv6.
Take the HE.net IPv6 certification to help improve your knowledge of IPv6.
Install a plugin in your browser so you can see whether a site is using IPv6 or not.